STM32 Cube AI Studio 教程
STM32 Cube AI Studio 是 STmicroelectronics 公司推出的一款模型部署和代码生成工具。其可以将 ONNX、tflite 等格式的模型针对 STM32 边缘计算场景进行优化和神经网络结构设计,生成代码到工程中,并提供接口用以进行逻辑编程。
软件安装
官方链接: STM32Cube.AI
需要注意的是,其依赖数个 STM32 运行库和支持包:
- STM32CubeMX
- STM32CubeProgrammer
- ST Edge AI Core
- STM32CubeIDE
- Keil (Optional)
- IAR Workbench (Optional)
在下载完成后,在 Settings 界面中将以上软件的安装目录设置好:

回到 Projects 页面,可以看到其允许新建项目,表明安装完成。
项目配置和模型转化
Cube AI Studio 允许将 Cube AI 的部分集成到现有的项目中,也允许新建项目。现在以新建项目为例。
首先,对于一个新的项目,需要新建一个 Runs,即算例,对应的要集成到 MCU 中的模型,如下图所示。
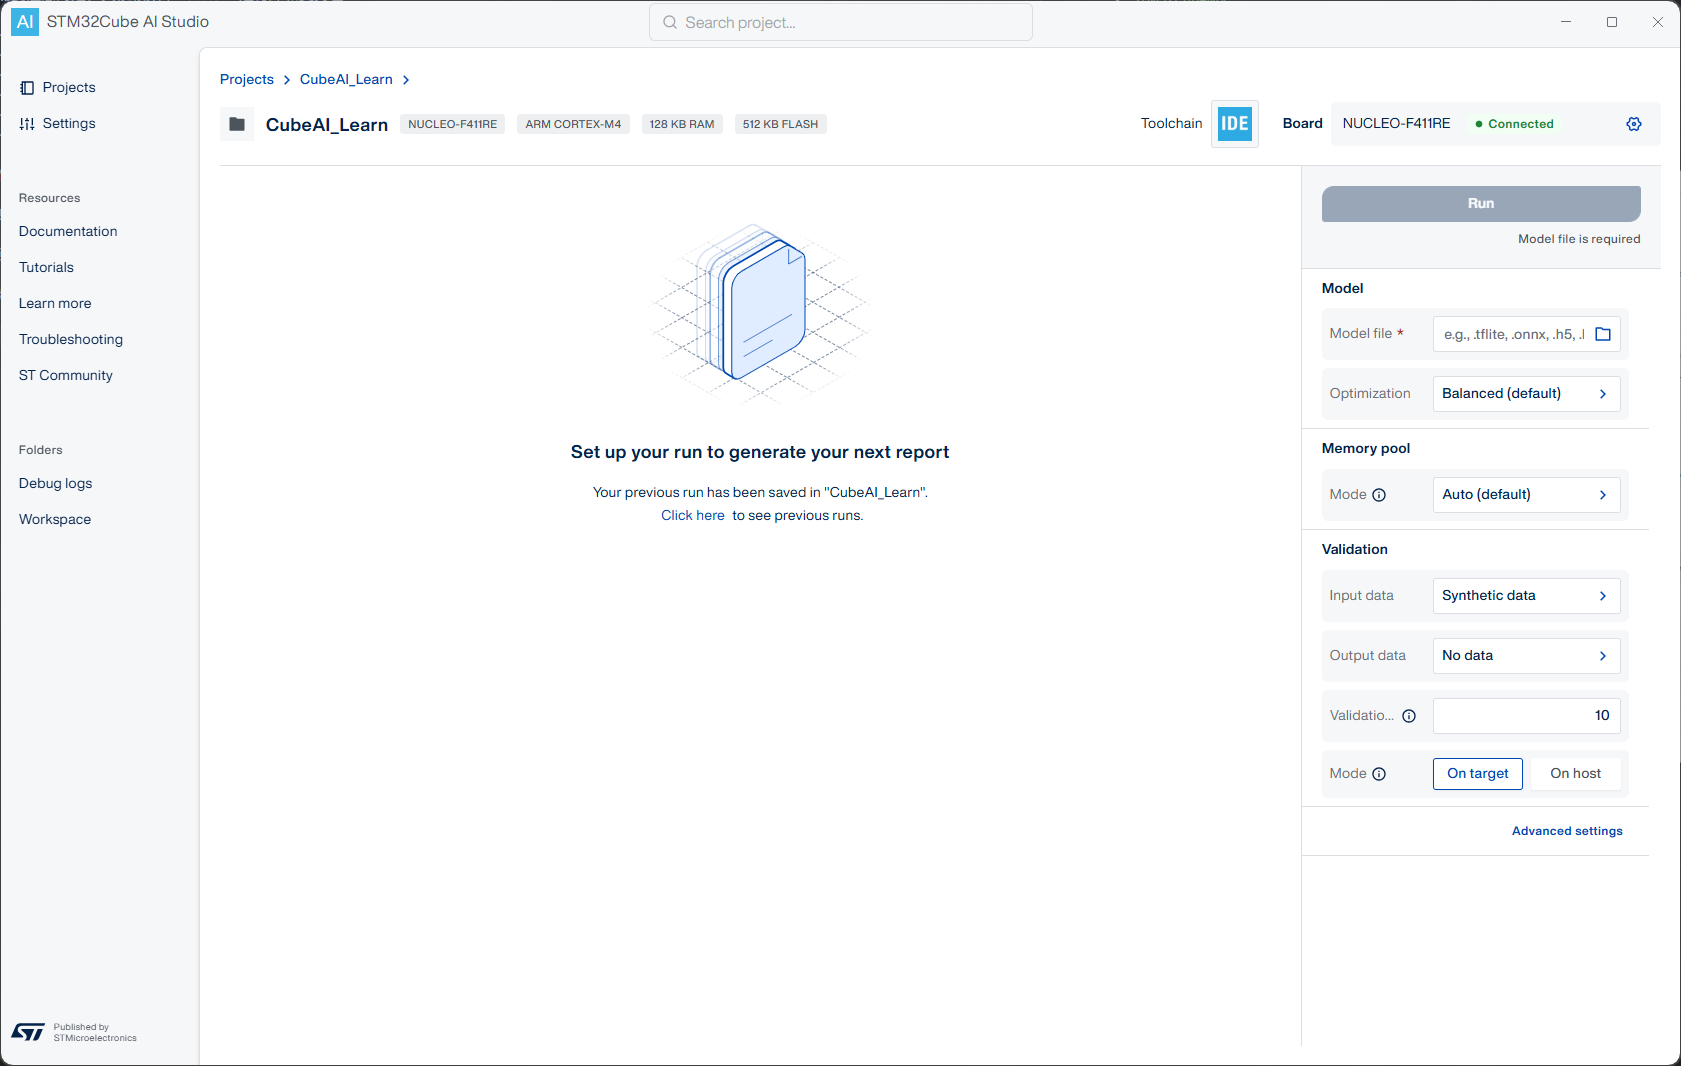
在右侧,选择模型文件(Model File),可以为 tflite/onnx/h5 等格式。然后选择在芯片中的存储位置(Memory Pool)、验证数据(Validation Data)等,就可以点击 Run 转化模型。转化完如图所示。
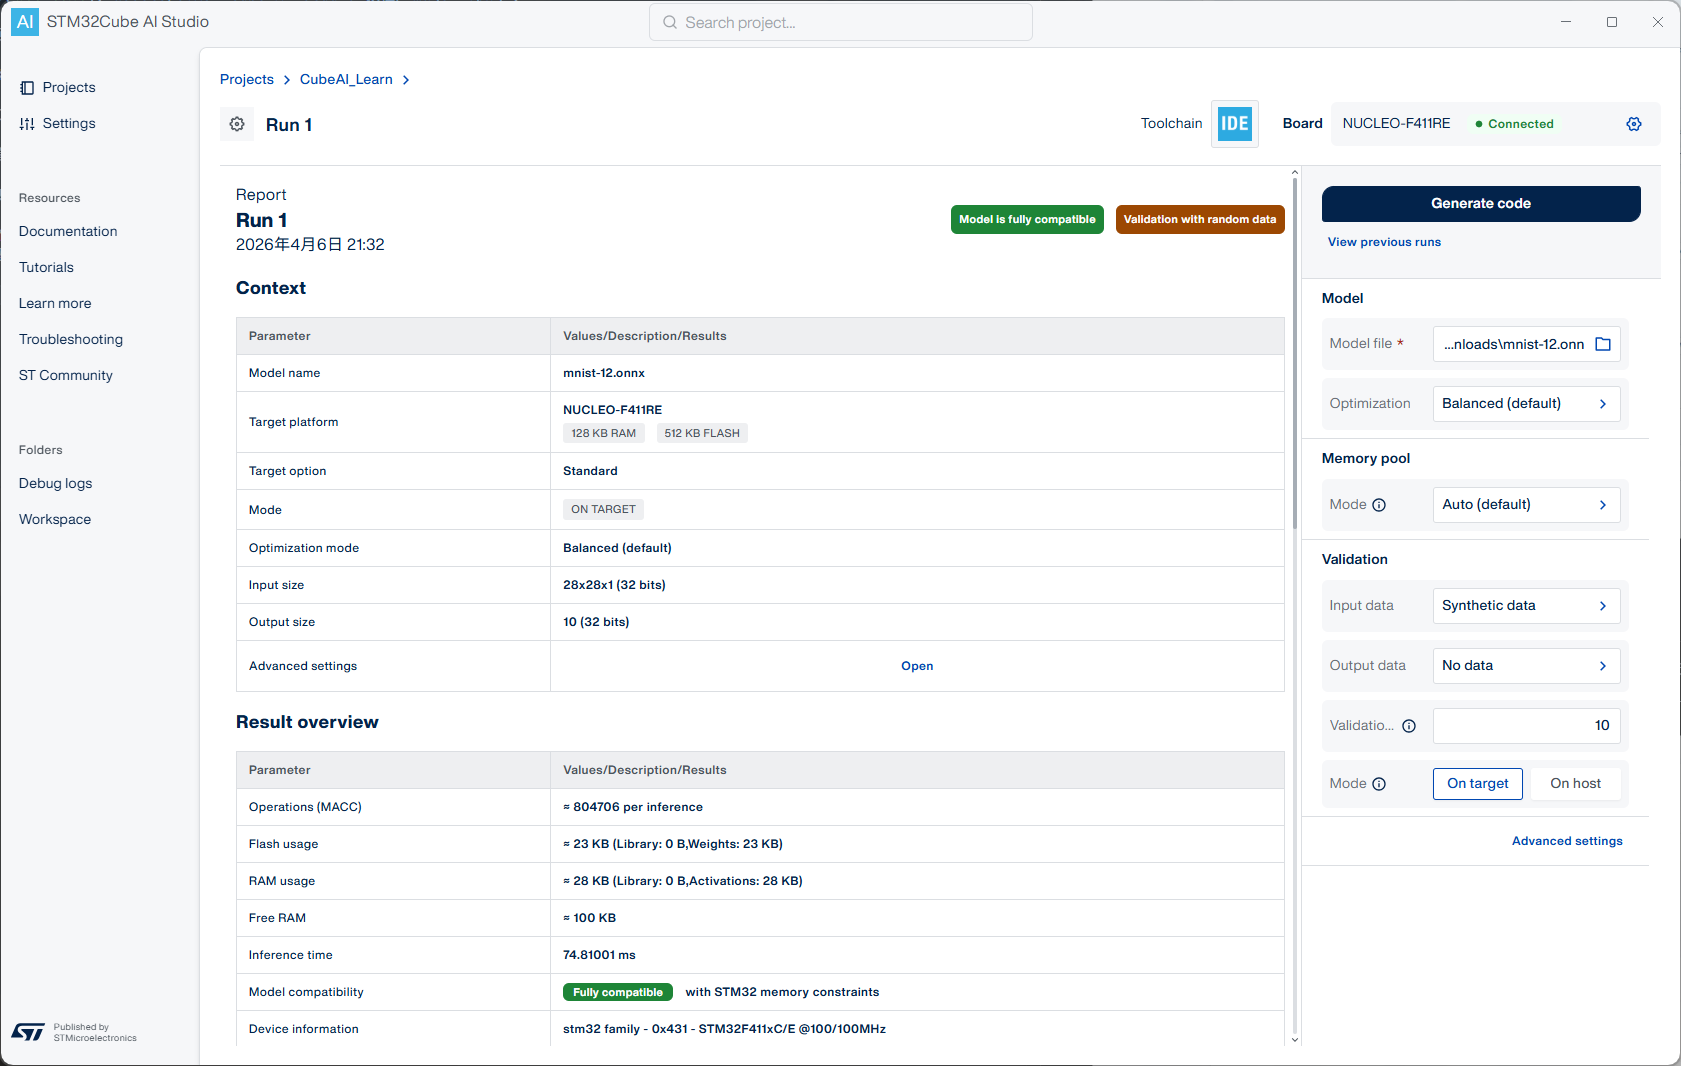
详情页记录了部分详细信息,如模型名称、目标芯片(开发板)型号、输入输出格式等。该输入输出格式和选择的模型不一定一致,是由 CubeAI 优化过的结果。
该输入输出格式在生成代码后于数据接口中有所体现,即替换一个维数相等的数组作为 input/output
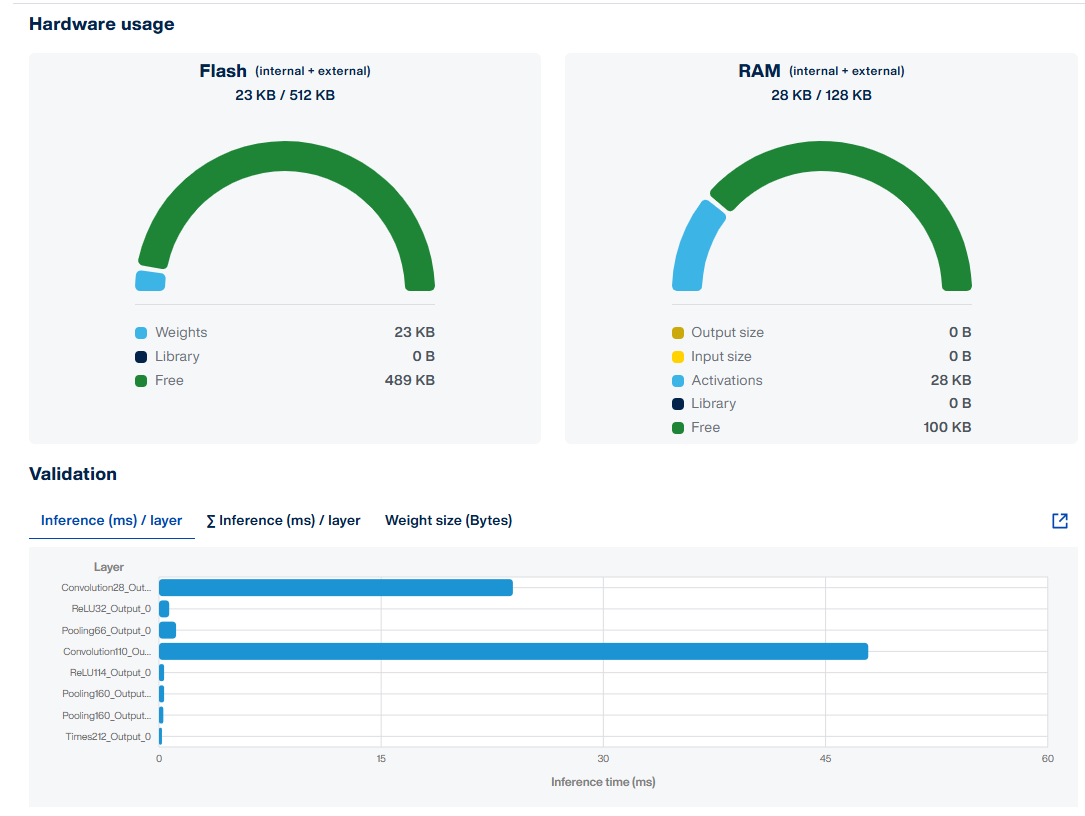
详细信息下方还有内存占用情况、神经网络结构等。

需要注意的是,在模型转化过程中,其会将其烧录到单片机中进行验证。所以硬件链接是建议的。
代码生成及部署
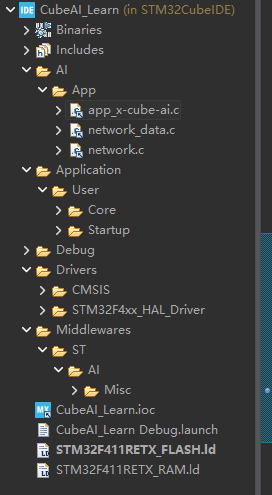
检查无误后,即可点击 Generate Code 按钮生成代码,项目类型为 Toolchain 中选择的 CubeIDE/Keil/IAR。其会在项目中生成 Middlewares/ST/AI、AI 两个内容,我们需要关注的部分在 AI/App/app_x-cube-ai.c 中。
进入 app_x-cube-ai.c 文件,找到函数 acquire_and_process_data() 和 post_process()。前者为获取数据的函数,后者为得到模型预测结果后的处理部分。这两个函数在 main_loop() 中被调用:
/*
 * Example of main loop function
 */
void main_loop() {
  while (1) {
    /* 1 - Acquire, pre-process and fill the input buffers */
    acquire_and_process_data();

    /* 2 - Call inference engine */
    aiRun();

    /* 3 - Post-process the predictions */
    post_process();
  }
}
而 main_loop() 在 STM32CubeAI_Studio_AI_Process(void) 被调用:
void STM32CubeAI_Studio_AI_Process(void)
{
    main_loop();
}
然后 STM32CubeAI_Studio_AI_Process(void) 在 main() 中被调用。通过这样的方式,我们的模型和数据调用接口被链接到项目中。
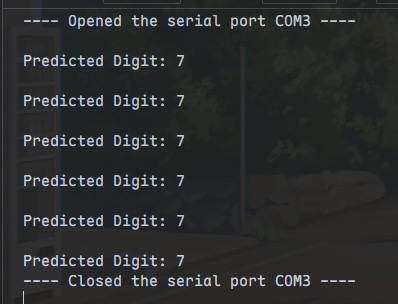
下面给出一个利用 mnist-12.onnx 模型进行训练,部署在 NUCLEO-F411RE 开发板上的代码示例:
// 这个变量用来模拟输入的 28x28 矩阵,作为手写数字识别模型的输入。
static const float mnist_test_digit_7[784] = {
   0,0,0,0,0,0,0,0,0,0,0,0,0,0,0,0,0,0,0,0,0,0,0,0,0,0,0,0,
   0,0,0,0,0,0,0,0,0,0,0,0,0,0,0,0,0,0,0,0,0,0,0,0,0,0,0,0,
   0,0,0,0,0,0,0,0,0,0,0,0,0,0,0,0,0,0,0,0,0,0,0,0,0,0,0,0,
   0,0,0,0,0,0,0,0,0,0,0,0,0,0,0,0,0,0,0,0,0,0,0,0,0,0,0,0,
   0,0,0,0,0,0,0,0,0,0,0,0,0,0,0,0,0,0,0,0,0,0,0,0,0,0,0,0,
   0,0,0,0,0,0,0,0,0,0,0,0,0,0,0,0,0,0,0,0,0,0,0,0,0,0,0,0,
   0,0,0,0,0,0,0,0,0,0,0,0,0,0.3,0.7,0.9,0.9,0.9,0.9,0.9,0.3,0,0,0,0,0,0,0,
   0,0,0,0,0,0,0,0,0,0,0,0,0,0.1,0.3,0.3,0.3,0.3,0.5,0.9,0.9,0,0,0,0,0,0,0,
   0,0,0,0,0,0,0,0,0,0,0,0,0,0,0,0,0,0,0,0.5,0.9,0.2,0,0,0,0,0,0,
   0,0,0,0,0,0,0,0,0,0,0,0,0,0,0,0,0,0,0,0.4,0.9,0.5,0,0,0,0,0,0,
   0,0,0,0,0,0,0,0,0,0,0,0,0,0,0,0,0,0,0,0.3,0.9,0.8,0,0,0,0,0,0,
   0,0,0,0,0,0,0,0,0,0,0,0,0,0,0,0,0,0,0,0.2,0.9,0.8,0,0,0,0,0,0,
   0,0,0,0,0,0,0,0,0,0,0,0,0,0,0,0,0,0,0,0.1,0.9,0.8,0,0,0,0,0,0,
   0,0,0,0,0,0,0,0,0,0,0,0,0,0,0,0,0,0,0,0,0.8,0.9,0.2,0,0,0,0,0,
   0,0,0,0,0,0,0,0,0,0,0,0,0,0,0,0,0,0,0,0.5,0.9,0.4,0,0,0,0,0,0,
   0,0,0,0,0,0,0,0,0,0,0,0,0,0,0,0,0,0,0,0.3,0.9,0.6,0,0,0,0,0,0,
   0,0,0,0,0,0,0,0,0,0,0,0,0,0,0,0,0,0,0,0.2,0.9,0.8,0,0,0,0,0,0,
   0,0,0,0,0,0,0,0,0,0,0,0,0,0,0,0,0,0,0,0.1,0.9,0.8,0,0,0,0,0,0,
   0,0,0,0,0,0,0,0,0,0,0,0,0,0,0,0,0,0,0,0,0.8,0.9,0.3,0,0,0,0,0,
   0,0,0,0,0,0,0,0,0,0,0,0,0,0,0,0,0,0,0,0.4,0.9,0.6,0,0,0,0,0,0,
   0,0,0,0,0,0,0,0,0,0,0,0,0,0,0,0,0,0,0,0.2,0.9,0.8,0,0,0,0,0,0,
   0,0,0,0,0,0,0,0,0,0,0,0,0,0,0,0,0,0,0,0.1,0.9,0.8,0,0,0,0,0,0,
   0,0,0,0,0,0,0,0,0,0,0,0,0,0,0,0,0,0,0,0,0.6,0.9,0.4,0,0,0,0,0,
   0,0,0,0,0,0,0,0,0,0,0,0,0,0,0,0,0,0,0,0,0.3,0.9,0.7,0,0,0,0,0,
   0,0,0,0,0,0,0,0,0,0,0,0,0,0,0,0,0,0,0,0,0,0,0,0,0,0,0,0,
   0,0,0,0,0,0,0,0,0,0,0,0,0,0,0,0,0,0,0,0,0,0,0,0,0,0,0,0,
   0,0,0,0,0,0,0,0,0,0,0,0,0,0,0,0,0,0,0,0,0,0,0,0,0,0,0,0,
   0,0,0,0,0,0,0,0,0,0,0,0,0,0,0,0,0,0,0,0,0,0,0,0,0,0,0,0
 };
int acquire_and_process_data()
{
  if (stai_input[0] != NULL) {
	  memcpy(stai_input[0], mnist_test_digit_4, sizeof(mnist_test_digit_4));
  }
  return 0;
}
int post_process()
{
	float *out_data = (float *)stai_output[0];
	  float max_val = -1.0f;
	  int predicted_digit = -1;

	  // MNIST 输出 10 个类别的概率
	  for (int i = 0; i < 10; i++) {
	      if (out_data[i] > max_val) {
	          max_val = out_data[i];
	          predicted_digit = i;
	      }
	  }

	  /* 通过 USART2 输出结果 */
	  char msg[64];
	  int len = sprintf(msg, "\r\nPredicted Digit: %d \r\n",
	                    predicted_digit);

	  // 假设在 main.c 里的串口句柄是 huart2
	  extern UART_HandleTypeDef huart2;
	  HAL_UART_Transmit(&huart2, (uint8_t*)msg, len, HAL_MAX_DELAY);
  return 0;
}
模型可以在 GitHub 下载: github.com/onnx/models
通过串口输出的预测结果如下: